I have also shown you how to install firmware (AT Commands Firmware) onto the on-board ROM of the ESP8266 WiFi Module. One thing (and it is an important thing) that I have missed (not intentionally) is to show you How to connect ESP8266 to WiFi Network. So, without further ado, let me show you how to connect ESP8266 to WiFi and use it in our IoT (Internet of Things) and other WiFi based Projects. NOTE:
Before proceeding, I strongly recommend you to refer to two of the earlier projects on ESP8266 WiFi Module: GETTING STARTED WITH ESP8266 AND ARDUINO and HOW TO UPDATE/FLASH ESP8266 FIRMWARE. There are many important things like Pin Configuration of ESP8266 (ESP-01) Module, How to connect ESP8266 to Arduino, and so forth that you must have a prior knowledge on before proceeding to connect ESP8266 to WiFi.
Overview
The tiny ESP8266 (ESP-01) WiFi Module is making wonders in the DIY Community as it allows devices like Arduino to access Web Pages by connecting to the Internet. The ESP8266 WiFi Module can be interfaced to any other microcontroller (like Arduino or 8051) through UART and with the help of AT Commands, the Microcontroller can control the ESP8266 (connect to WiFi, update Firmware, etc.). So, in order to use the ESP8266 WiFi Module in our Internet related projects, we need to first connect ESP8266 to WiFi and then access it from the internet. Before going into the details of how to connect ESP8266 to WiFi, you need to understand the WiFi modes of operation of the ESP8266 Module.
WiFi Modes of Operation of ESP8266
There are three modes of WiFi Operation in the ESP8266 WiFi Module. They are:
Station Mode (STA) Soft Access Point (AP) Soft AP + Station
Station Mode (STA)
In Station Mode (STA), the ESP8266 WiFi Module will be connected to a WiFi Network that is already setup by an Access Point, like a WiFi Router.
Soft Access Point (AP)
The second mode of operation is Access Point (AP) Mode. In this mode, the ESP8266 Module acts as an access point and provide WiFi Network to other stations (like mobile or laptop). Usually, an access point can provide internet through a wired network to its stations but as there is no wired interface, this Access Point mode is called Soft Access Point. The ESP Module is first setup as Soft AP mode before configuring it in Station Mode. This is helpful when the username (SSID) and password of the WiFi network is unknown.
Soft AP + Station
In the third mode, the ESP8266 WiFi Module is configured to act in both Station Mode and Soft AP Mode. All these Modes of Operation are set using AT Commands. In this tutorial, I will discuss about the AT Commands that are required to connect ESP8266 to WiFi Network. In a separate tutorial, I’ll talk about some of the important and useful ESP8266 AT Commands.
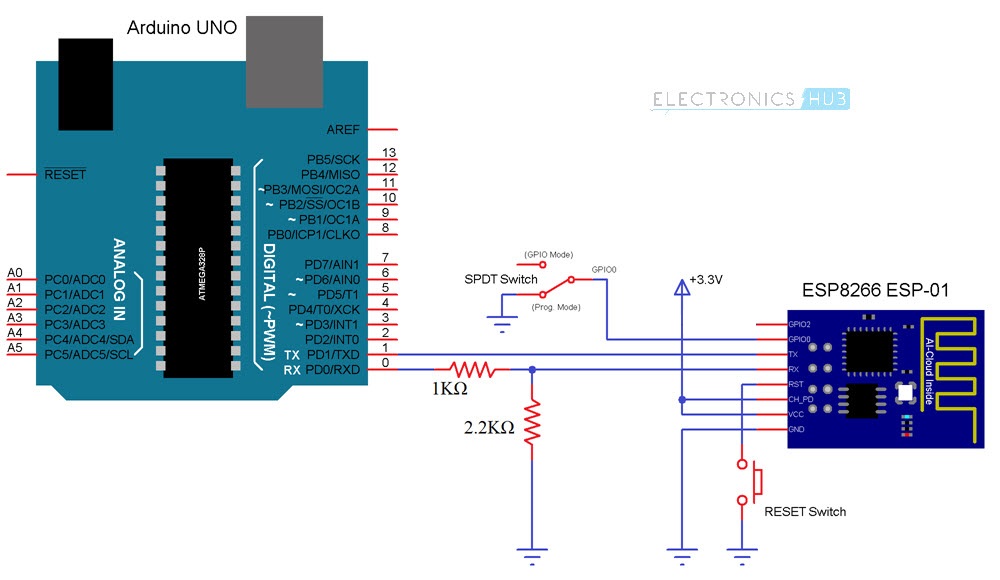
Circuit Diagram
Components Required
ESP8266 (ESP-01) WiFi Module Arduino UNO (an USB-to-Serial Adapter is sufficient) Push Button Slide Switch 1 KΩ Resistor (1/4 Watt) 2.2 KΩ Resistor (1/4 Watt) Connecting wires
How to Connect ESP8266 to WiFi Network using AT Commands?
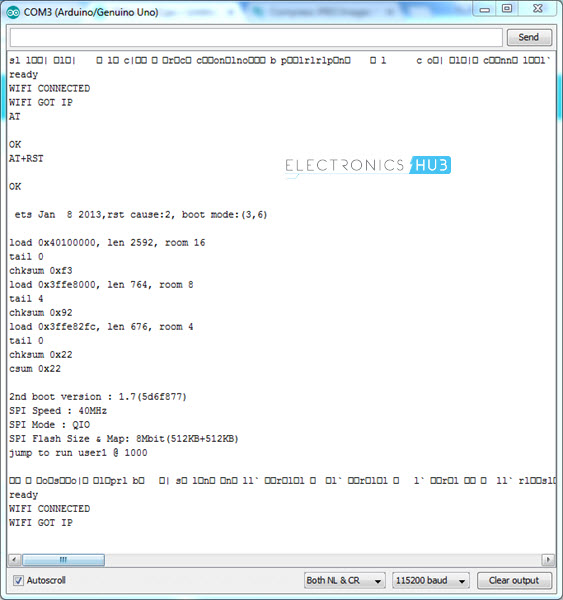
Before seeing how to connect ESP8266 to WiFi network, you have to remember that the ESP8266 WiFi Module is loaded with AT Commands Firmware. Please refer to the project “HOW TO FLASH FIRMWARE ON ESP8266” before proceeding with connecting the ESP8266 WiFi Module to a WiFi Network. So, after connecting the ESP8266 in Programming Mode and ensuring that it has AT Commands Firmware, connect the Arduino to the Computer and open the Serial Monitor. In my case, I have set the Baud rate to 115200 and also selected “Both NL & CR” option in the Arduino’s Serial Monitor. Change these settings as per your requirements. First, type the following command to test whether the communication is successful or not. AT Then, I will restart the ESP8266 Module using the following command, just to make sure that I start fresh. AT+RST
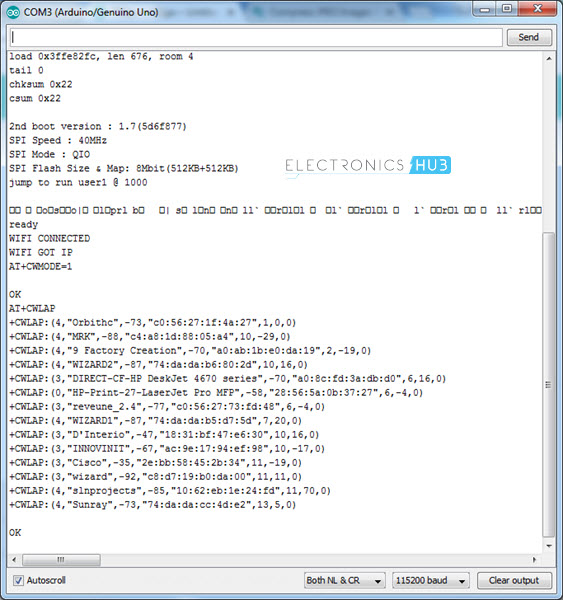
Now, I need to set the Mode of operation as Station Mode. For this, use the following command. AT+CWMODE=1 The Mode of Operation has been set as Station Mode (STA). Now, to see the list of all the nearby WiFi Networks, use the command shown below. AT+CWLAP
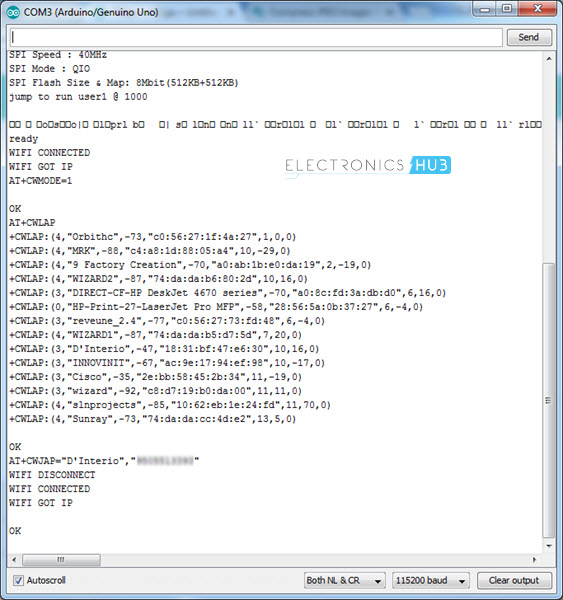
In order to join a network, use the following command. AT+CWJAP=”SSID”,”PASSWORD” In place of SSID, type the name of your WiFi Network and in place of PASSWORD, well type the password.
Within few seconds, you will get a confirmation response as WIFI Connected. In order to check the IP Address of the ESP8266 WiFi Module, type the command. AT+CIFSR
Alternative Way to Connect Your ESP8266 WiFi Module to a WiFi Network
If you are tired of typing all these AT Commands in order to connect ESP8266 WiFi Module to a WIFi Network, then there is an alternative way. In this method, I’ll be programming the ESP8266 WiFi Module (which means the AT Command Firmware will be erased). The code for this is shown below.
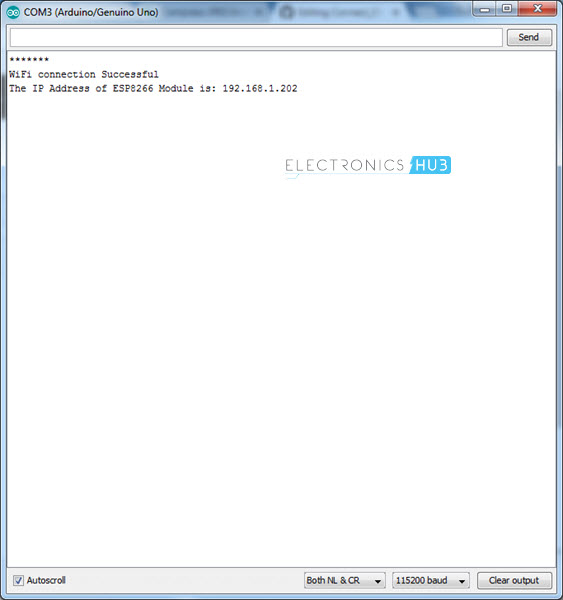
NOTE: In the code, enter the details of your WiFi Network in place of “ssid” and “password”. Before programming, select the “Generic ESP8266 Module” from boards and also select the correct COM Port. More information about programming ESP8266 WiFi Module (Blink example) can be found here: GETTING STARTED WITH ESP8266 AND ARDUINO. Now, connect the GPIO0 to GND and reset the ESP and hit the upload button. The ESP8266 WiFi Module will be automatically connected to the specified WiFi Network and it also responds with the IP Address.
Conclusion
In this project/tutorial, I have shown you how to connect an ESP8266 WiFi Module to a WiFi Network using both AT Commands and programming. In the next tutorial, I’ll highlight some of the important AT Commands of the ESP8266 Module. Comment * Name * Email * Website
Δ




![]()